Using the Solid Framework ASP.NET Sample
Using Solid Framework directly within an ASP.NET process can be troublesome:
- Concurrent requests under ASP.NET can occur within the same process (a single process can host multiple AppDomains). Solid Framework is not compatible with AppDomain process/thread behaviour.
- Document reconstruction is resource intensive (CPU and memory): too many concurrent requests can easily exhaust server resources.
- IIS user permissions (to save files locally or execute non-managed code) change with each IIS update. In contrast, permissions to make web service requests from ASP.NET are well understood and trivial to configure.
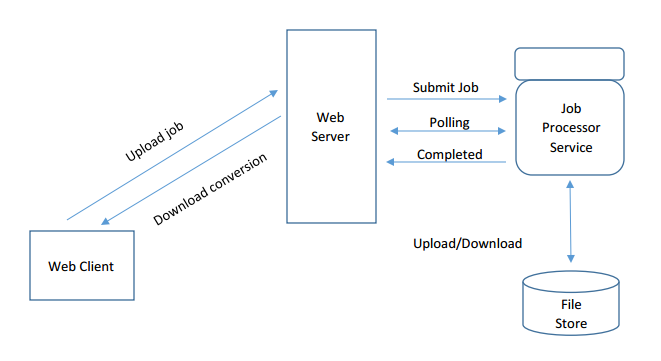
Solid Framework’s Job Processor is an elegant architectural solution to all these issues. It can be run as a Windows service and communicate with ASP.NET through WCF. The Job Processor runs concurrent conversions under parallel worker processes (not threads) and manages load in a highly configurable way. The number of worker processes is automatically determined based on the capacity of the server but can also be manually configured. Conversion jobs are automatically queued by the Job Processor for the next available worker process.
Your ASP.NET app on the web server calls the Job Processor (as a web service) to transfer files, submit jobs for processing and return results. The flow is as follows:
This sample includes source code for a reference implementation of a Windows Service that runs the Solid Framework Job Processor as a web service. It also includes a simple example of an ASP.NET web app that uses this conversion service. The Job Processor Service used in this sample is similar to the one used by SimplyPDF
Steps for Using ASP.NET Sample with Visual Studio
- Download the ASP.Net Sample from here.
- Navigate to where you have saved the sample and open the JobProcessorService.sln project.
- Open JobProcessorService.cs, on line 47 set your license code here and update the Solid Framework reference.
- Create a folder where uploaded pdf files go. Update lines 27 in JobProcessorService.cs to match this location.
- Specify the location of a log file in line 29. Make sure that this folder actually exists on the machine on which the JobProcessorService will be running.
- Go to WinServiceJobProcessorHost project in the Solution Explorer, right click and click on Rebuild.
- Open up a command window as Administrator.
- In the command window navigate to folder where your sample JobProcessorService.sln is saved. Then navigate further in that tree to \WinServicesJobProcessorHost\bin\Debug and press Enter.
- Now type c:\Windows\Microsoft.NET\Framework\”Your version of .net”\installutil /i WinServiceJobProcessorHost.exe then press enter. This will install and start the JobProcessorWindowsService .
- Go to My computer, Right Click and choose Manage.
- Go to Services and Applications > Services. Find JobProcessorWindowsService and make sure it has started.
- Go back to the Visual Studio and find PDFtoWordWeb in the Solution Explorer, right click and select Set as Start up Project.
- Go to the Service Reference folder, right click on JobProcessorServiceReference and choose Update Service Reference.
NOTE: If you get an error asking for missing reference Reference.cs- Delete the JobProcessorServiceReference you’ve just updated.
- Right click on Service Reference and Add Service Reference
- Set the address to the relevant local host for your server
- Change the Namespace to JobProcessorServiceReference
- Click OK
- Right click on PDFtoWordWeb and choose Rebuild.
- Hit F5 to run the project.
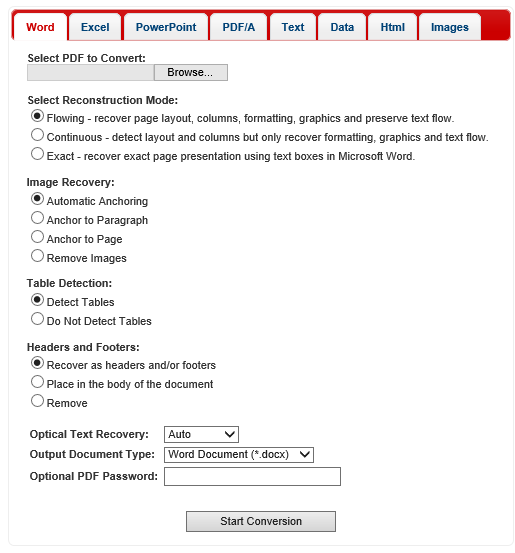
How the project will appear within a browser
You will then be able to select and convert PDF files to other formats.
We understand this is a complex example. If you require assistance please contact us at support@soliddocuments.com.
Please include the version of Windows, IIS, Visual Studio and Solid Framework in use.